Laptops/Desktops
The following instructions will help you locate your MAC address. Registering your devices MAC address is required in order to access STELLAR Community WiFi. Once you locate your MAC address, add your devices within your ‘My Account’.
MacOS X Yosemite - Wireless Network
- Click 'WiFi' and choose 'Advanced'.
- Double click the Network icon.
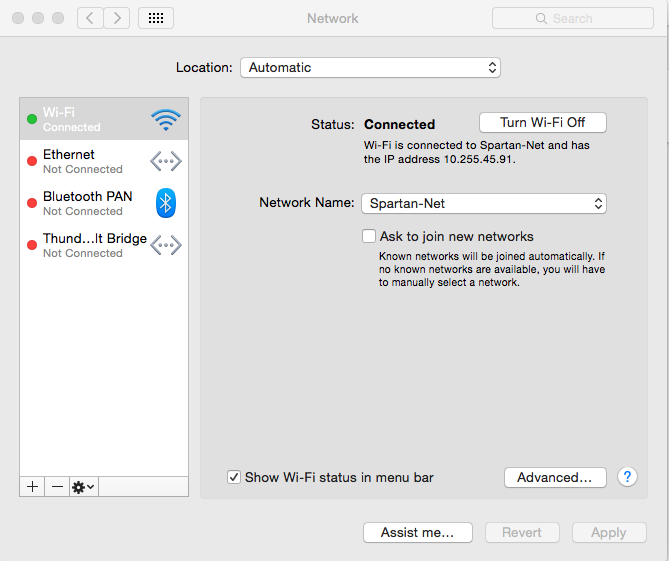
- Click ‘WiFi’ and choose ‘Advanced’.
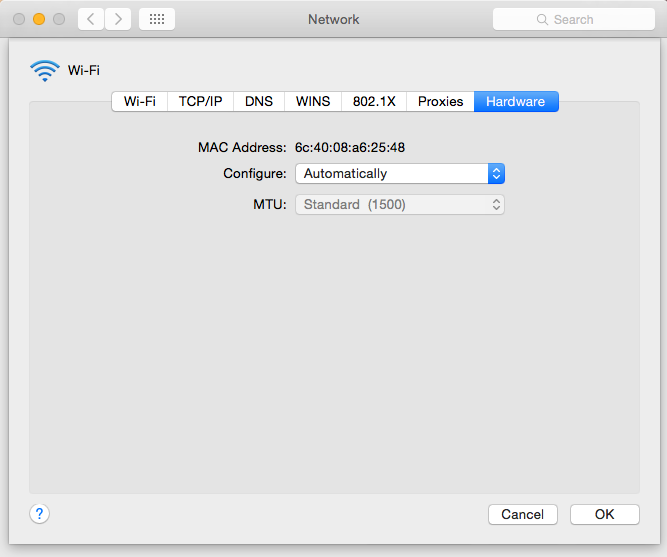
- Click the Hardware tab. Your MAC address will be displaying first.


MacOS X Leopard - Wireless Network
- Click the Apple in the upper-left corner and select ‘System Preferences’.
- Double click the Network icon.
- Click ‘Airport’ and choose ‘Advanced’.
- Click the Airport tab. Your MAC address is the Airport ID.


MacOS X Lion - Wireless Network
- Click the Apple in the upper-left corner and select ‘System Preferences’.
- Double click the Network icon.
- Click ‘Airport’ and choose ‘Advanced’.
- Click the Airport tab. Your MAC address is the Airport ID.


Windows Computer
- Click the ‘Start’ menu button on the Windows task bar.
- Type ‘Run’ in the search bar, then open the program ‘Run’ by clicking on it.
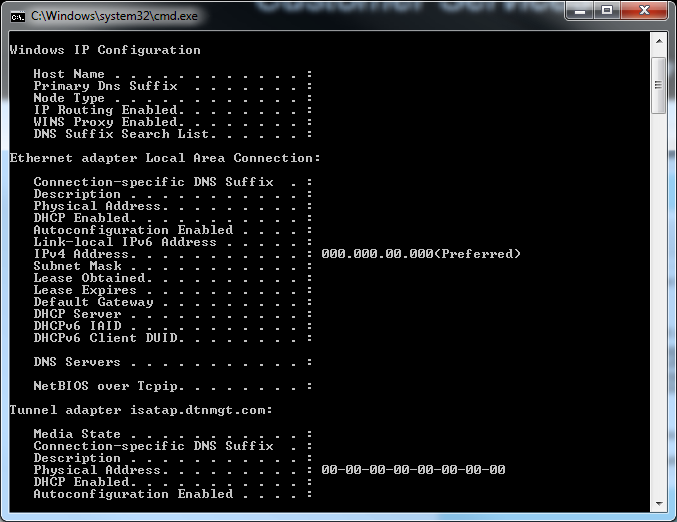
- Type ‘cmd’ in the text box that appears and click ‘OK’. A command prompt window launches on the desktop.

- In this command window, type ‘ipconfig/all’ and press ‘Enter’ on your keyboard.

- The ‘Physical Address’ field states the MAC Address for that adapter.
Phones/Tablets
The following instructions will help you locate your MAC address. Registering your devices MAC address is required in order to access STELLAR Community WiFi. Once you locate your MAC address, add your devices within your ‘My Account’.
 Amazon Kindle Fire
- From the home screen, tap on the ‘Settings’ icon, which is located in the top right corner.
- Tap on ‘Settings’ or could be labeled ‘More’.
- Tap on ‘Device’
- You should now see your MAC Address, labeled ‘Wi-Fi MAC Address’.
Android Phone
Depending on your Android decive, please try one of the following list of steps.
- Go to ‘Settings’.
- Tap ‘About Phone’.
- Tap ‘Status’ (or tap ‘Hardware Information’)
- You should now see your MAC Address, labeled ‘Wi-Fi MAC Address’.
- Go to ‘Settings’.
- Select ‘Wireless’ and ‘Network’ or ‘Connections’
- Select ‘WiFi settings
- You will find the MAC Address under the ‘Advanced’ section.
Android Tablets
Depending on your Android tablet, please try one of the following list of steps.
- From the home screen, tap the ‘Menu’ key.
- Tap ‘Settings’.
- Scroll down and tap ‘About Tablet’.
- Tap ‘Status’ then scroll down to view ‘WiFi Mac address’.
 Blackberry
- From the home screen, tap ‘Settings’ (if not available, swipe down from the top of the display (where the time is located).
- Tap ‘Network Connections’, then tap ‘Wi-Fi’
- Tap ‘Advanced’ (located in the lower-right; to the right of ‘Add’).
- Tap the ‘Diagnostic Information’ dropdown menu.
- Tap ‘Device Information’ and you should be able to locate the ‘Physical Address’ (Mac address).
IOS
- From the home screen, tap ‘Settings’.
- Tap ‘General’ then tap ‘About’.
- The Mac address is located at the Wi-Fi Address section.
Windows Phone
- Open the App list and tap on ‘Settings’.
- Tap ‘about’ in system settings.
- Then tap on ‘more info’ and you will be able to view your MAC Address.
TV Streaming Devices
The following instructions will help you locate your MAC address. Registering your devices MAC address is required in order to access STELLAR Community WiFi. Once you locate your MAC address, add your devices within your ‘My Account’.
Apple TV
- Go to the main menu on your Apple TV device and select ‘Settings’.
- Select ‘About’ from the menu to view the network information.
- Here you can find your MAC address, listed as either the ‘Wireless ID’ or ‘Ethernet ID’ (Depending on the connection you are using).
Alternative Method
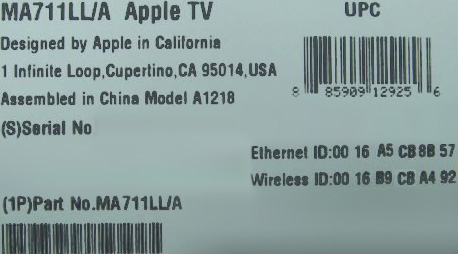
The Apple TV Ethernet (wired) and Wireless network MAC addresses can be found on the UPC label on the Apple TV box as Ethernet and Wireless ID.

Roku
- From the Home screen, select ‘Settings’.
- Select ‘About’.
- The ‘Wireless MAC address’ will be displayed on the screen. If you use a wired connection, you’ll need the ‘Ethernet MAC address’.
Gaming Systems
The following instructions will help you locate your MAC address. Registering your devices MAC address is required in order to access STELLAR Community WiFi. Once you locate your MAC address, add your devices within your ‘My Account’.
 Playstation 2
Depending on your Playstation 2 model, please try one of the following lists of steps:
OriginalTo find the MAC address of your Sony PlayStation 2 you will need the Network Adapter connected to the PS2 and you will need the disc that came with the Network Adapter.
- Power up the PS2 and load the Network Adapter Startup Disc, once loaded, select ‘ISP Setup’ and press X on your controller.
- The ISP Setup will begin to load, and you will be presented with a license agreement. Select ‘Agree’ and press X to continue. For connection type, choose ‘Local Area Network (LAN)’ and press X to continue.
- Select ‘Automatic Configuration’ and press X to continue.
- At the connection test screen, select ‘Advanced’ and press X to continue.
- At the Advanced Broadband Settings screen, make sure ‘Automatic’ is selected. While you are at this screen, make note of the MAC address at the bottom.
The process differs slighly with the slim version of the PS2. With the slim version, follow these directions:
- Turn on the console without a game in the tray.
- Press the triangle to show the version information.
- Your MAC address should be displayed near the bottom.
 Playstation 3
- Turn on your Playstation 3 without any disk in the drive.
- Navigate to the ‘Settings’ icon (located on the far left). Press the X button on your controller.
- Select ‘Network Settings’ with the X button on your controller.
- Select ‘Settings’ and Connection Status List and you will see your MAC Address.
 Playstation 4
- Turn on your Playstation 4 without any disk in the drive.
- Navigate to the Settings icon and press the X on your controller.
- Select the System icon under the Settings menu.
- Select ‘System Information’ and you should then be able to see your MAC Address.
 Playstation Portable
- Navigate to ‘System Settings’.
- Navigate to ‘System Information’.
- You should now see your MAC Address.
 Nintendo Switch
- Select "System Settings" from the HOME Menu.
- Scroll down through the menu and select "Internet."
- The Nintendo Switch console's MAC address will be listed under "System MAC Address."
Wii
- From the home screen, select the Wii button in the lower left hand corner.
- Select ‘Wii Settings’.
- Select the right arrow to advance to the 2nd set of settings and select the Internet option.
- Select ‘Console information’, you should now see your MAC Address.
Wii U
- On your Wii U, go to the Wii U Menu and select ‘System Setting’.
- Select ‘Internet’, then select ‘View MaC Address’.
 Xbox
Xbox
- Turn on your Xbox console with no game disc in the disc tray.
- From the Xbox Dashboard, choose ‘settings’ then select ‘Network Settings’.
- Select ‘IP Address’ and confirm the configuration is set to ‘automatic’.
- Go back to ‘Network Settings’. Select ‘DNS Servers’ to confirm that configuration is set to ‘automatic’.
- Back at ‘Networks Setting ’window, the MAC Address is located at the bottom right corner.
 Xbox 360
- Go to the System area of the Xbox Dashboard and select ‘Network Settings’.
- Select ‘Edit Settings’.
- Under Basic Settings, check to make sure the IP Settings is on ‘Automatic’.
- Now go to ‘Additional Settings’, select ‘Advanced Settings’ and at the bottom of the screen you will see your MAC Address.
 Xbox One
- If you are signed into your profile, navigate to ‘My Games & Apps’. Skip this step if you are not signed into a profile.
- Select ‘Settings’ then select ‘Network’.
- Select ‘Advanced Settings’ and your MAC Address should be displayed on this screen.
Routers
No need to register anything for routers.Just plug it into the data port with your Ethernet cable and follow your manufactures setup instructions.