Setting up your Receivers:
1
Setting Up Your HD Receiver
You can setup your HD receiver in two ways: A: With an HDMI cable OR B: With an RCA cable (AV cable)
A: Using an HDMI Cable
For the best quality, we recommend setting up your receiver with an HDMI cable. This will provide the best picture and audio.
Required parts: High definition receiver, HDMI cord, coaxial cable, power cord, DIRECTV remote.
Required parts: High definition receiver, HDMI cord, coaxial cable, power cord, DIRECTV remote.
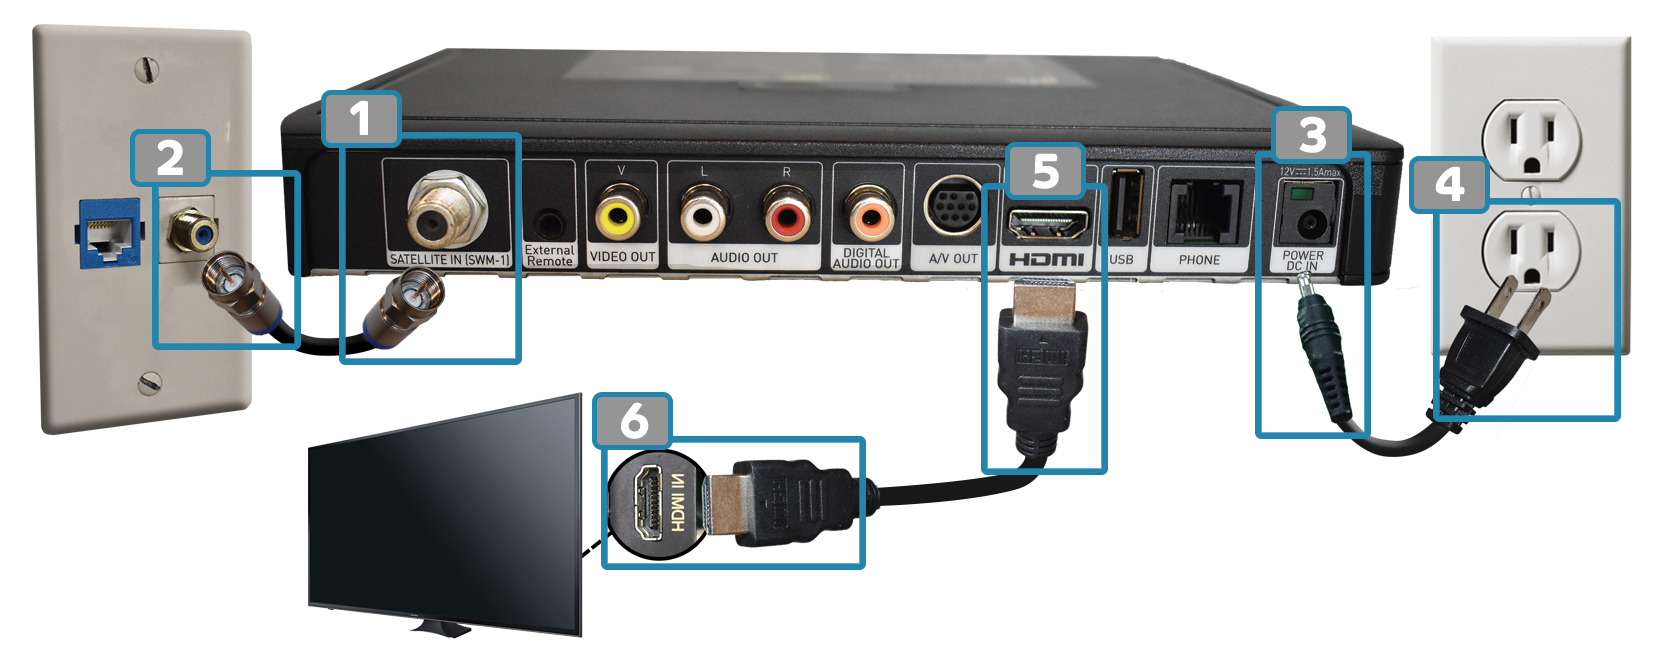
- Gently screw one end of the coaxial cable into the Satellite In port on the back of your receiver.
- Gently screw the other end of the coax cable into the wall plate.
- Plug the receiver side of the power cord into the port labeled Power DC in on the back of your receiver.
- Plug the other end of the power cord into the wall outlet.
- Plug one end of the HDMI cord into the back of your receiver.
- Plug the other end of the HDMI cord into the back/side of your TV [both ports in steps 5 and 6 are labeled HDMI].
B: Using an RCA Cable (AV Cable)
Is your TV not equipped for an HDMI setup? We have another way for you to set up! Swap out the HDMI cable and use an RCA cable for your audio and video. Note: This option will not give you the same results as using an HDMI cable.
Required parts: High definition receiver, RCA cable, coaxial cable, power cord, DIRECTV remote.
Required parts: High definition receiver, RCA cable, coaxial cable, power cord, DIRECTV remote.
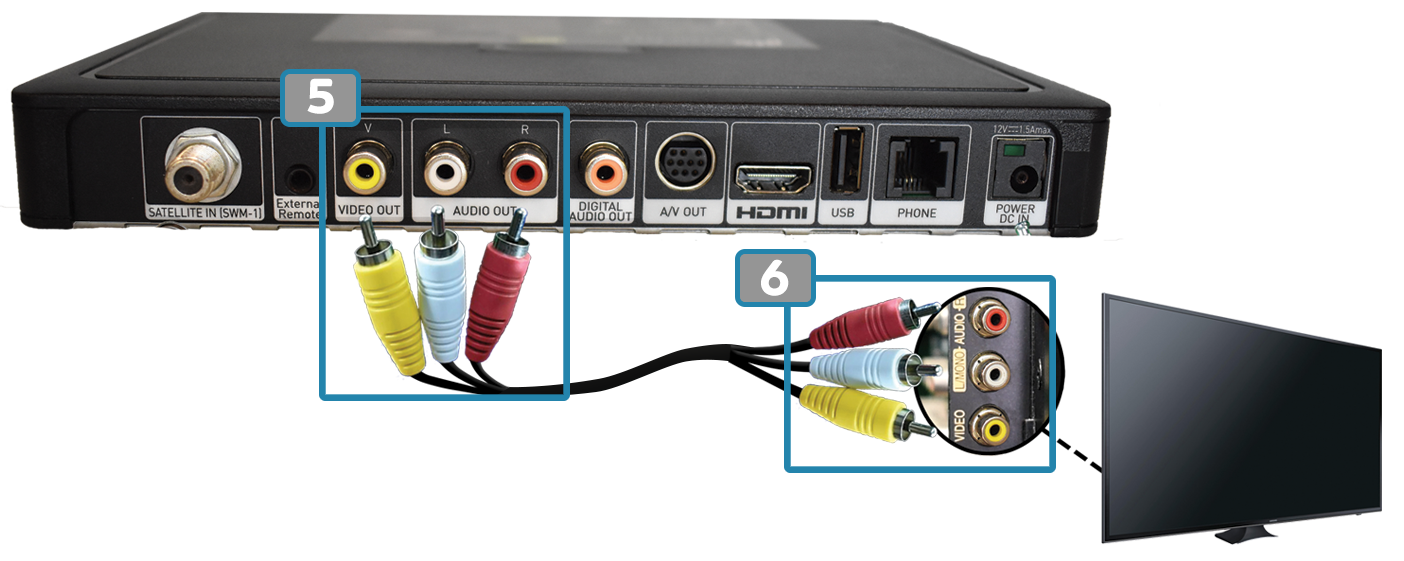
Follow steps 1-4 in the example 1A.
- Plug in the yellow, white, and red RCA cables into the corresponding colors on the back of your receiver.
- Plug the other end of the RCA cable into the corresponding colors on the back/side of your TV.
2
Setting Up Your HD-DVR Receiver
You can setup your HD-DVR receiver in three ways: A: With an HDMI cable, B: With an RGB cable and audio cable,
OR C: With an RCA cable (AV cable)
A: Using an HDMI Cable
For the best quality, we recommend setting up your receiver with an HDMI cable. This will provide the best picture and audio.
Note: If you have Whole Home DVR service, do not perform steps 3 and 4. Required parts: HD-DVR receiver, HDMI cord, coaxial cable, ethernet cable, power cord, DIRECTV remote.
Note: If you have Whole Home DVR service, do not perform steps 3 and 4. Required parts: HD-DVR receiver, HDMI cord, coaxial cable, ethernet cable, power cord, DIRECTV remote.
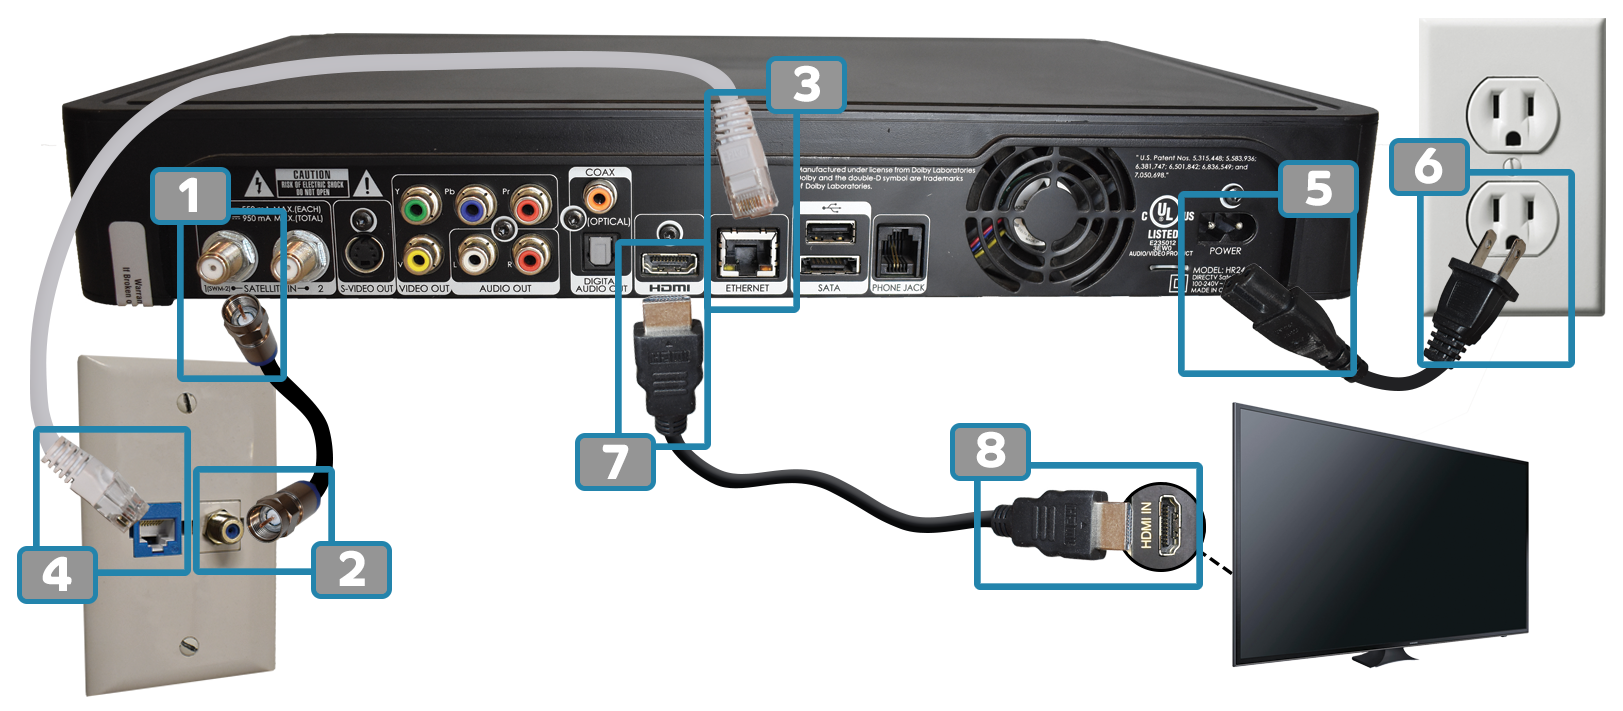
- Gently screw one end of the coaxial cable into the Satellite In port on the back of your receiver. Note: Make sure to use the 1(SWM-2) port.
- Gently screw the other end of the coax cable into the wall plate.
- Plug one end of the ethernet cable into the back of your receiver in the port labeled Ethernet.
- Plug the other end of the ethernet cable into the wall Internet port
- Plug the receiver side of the power cord into the port labeled Power DC in on the back of your receiver.
- Plug the other end of the power cord into the wall outlet.
- Plug one end of the HDMI cord into the back of your receiver.
- Plug the other end of the HDMI cord into the back/side of your TV [both ports in steps 5 and 6 are labeled HDMI].
B: Using RGB cable and Audio Cable:
If your TV is incapable of an HDMI setup, we have an alternative option for setting up your HD-DVR receiver and still obtaining
high definition picture! The red, blue, and green components provide your high quality video display. The red and white
components of the RCA cable supply the audio. Note: If you have Whole Home DVR service, do not perform steps 3 and 4.
Required parts: HD-DVR receiver, RGB cable, RCA cable, coaxial cable, ethernet cable, power cord, DIRECTV remote.
Required parts: HD-DVR receiver, RGB cable, RCA cable, coaxial cable, ethernet cable, power cord, DIRECTV remote.
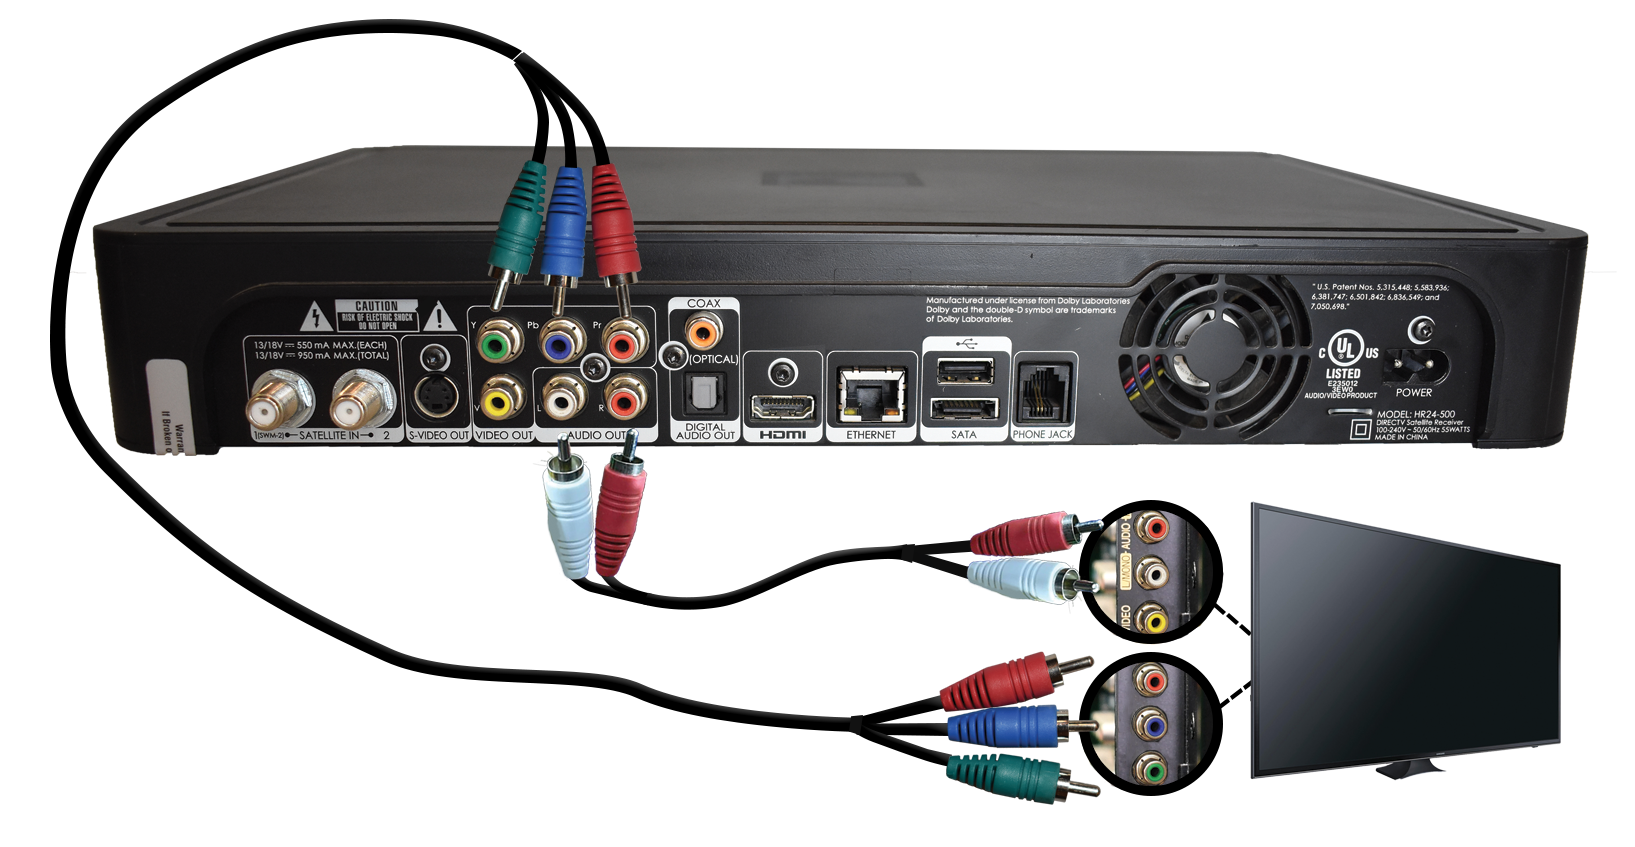
Follow steps 1-6 in the example 2A.
- Plug in the yellow, white, and red RCA cables into the corresponding colors on the back of your receiver.
- Plug the other end of the RCA cable into the corresponding colors on the back/side of your TV.
C. Using an RCA Cable:
If the previous two options to setup your HD-DVR receiver are unavailable to you, we have an additional way for you to set up!
Although, this option will not give you the same quality as the previous two options. Note: if you have Whole Home DVR service,
do not perform steps 3 and 4.
Required parts: HD-DVR receiver, RCA cable, coaxial cable, ethernet cable, power cord, DIRECTV remote.
Required parts: HD-DVR receiver, RCA cable, coaxial cable, ethernet cable, power cord, DIRECTV remote.
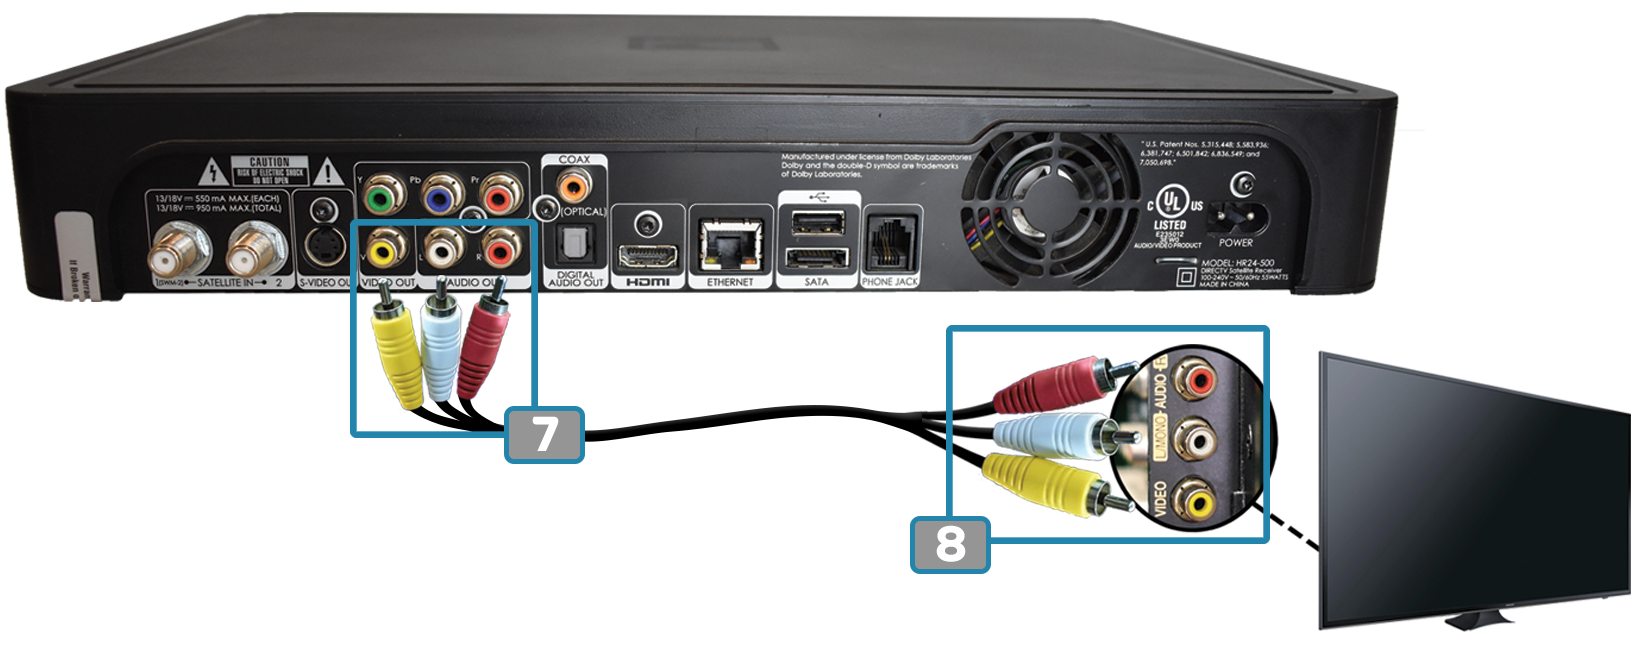
Follow steps 1-6 in the example 2A.
- Plug in the yellow, white, and red RCA cables into the corresponding colors on the back of your receiver.
- Plug the other end of the RCA cable into the corresponding colors on the back/side of your TV.
3
Genie Receivers
STELLAR Broadcast requires scheduling an installation appointment for Genie receivers.