Connecting to the Internet can be done in a few ways:
1
Directly to Your Device
2 WiFi Router
3 Community WiFi
4 Unique Network
Landmark on Grand River, Newman Lofts, CRMC Houses 5 Cross Connect
(Multi-Colored Panel)
Landmark on Grand River, Newman Lofts, CRMC Houses 5 Cross Connect
(Multi-Colored Panel)
Watch this setup video for simple instructions on how you can connect to our ultra-fast fiber internet via WiFi router or to your device directly.
1
Connect Directly with a Wired Connection
In your apartment/home, you will see one of these three methods of connection. Follow the instructions based on what you see in your living room, hall closet or utility closet.
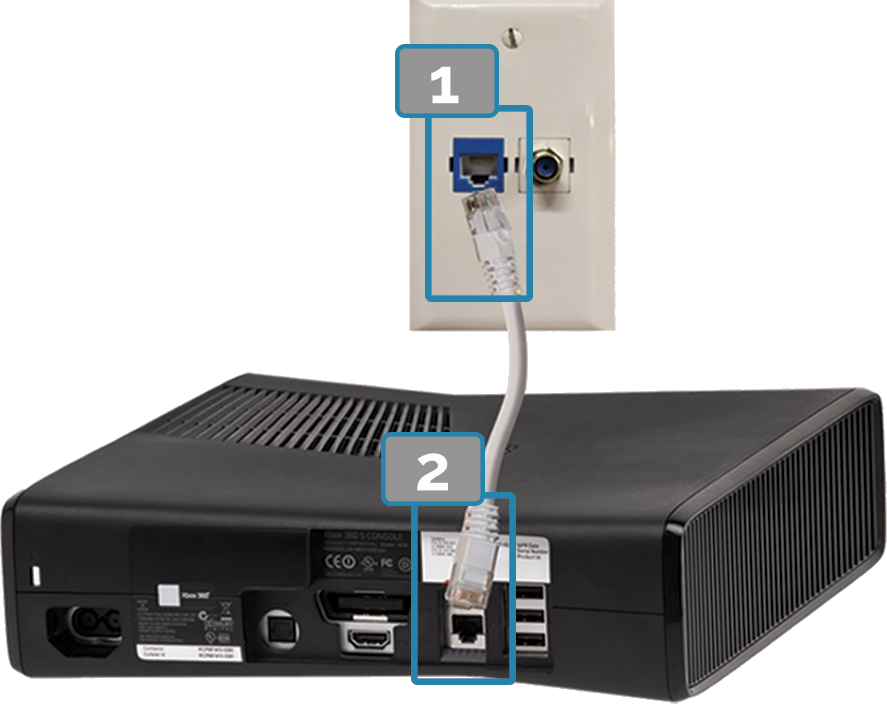
A: Connecting to the Wall Ethernet Port
Required parts: Ethernet cable, device with an ethernet port.
- Plug one end of the ethernet cable into the wall Internet port on your wall plate in your apartment.
- Plug the other end of the cable into the ethernet port located on your device (laptop, gaming console, etc.)
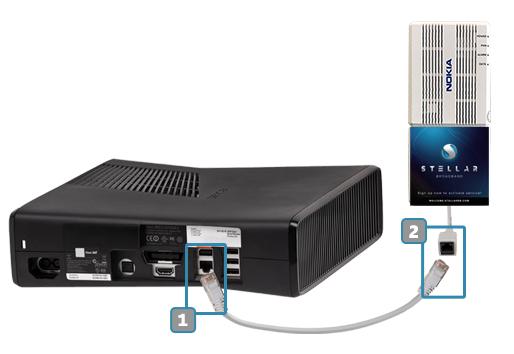
B: Connecting to the Nokia Gateway
- There will be a device on your living room wall as pictured. Plug one end of an Ethernet cable into the Ethernet port attached to it.
- Plug the other end into the Ethernet port on your device.
With this connection type, if you want WiFi throughout your whole apartment, you will need your own WiFi router to connect to WiFi (see option 2B).
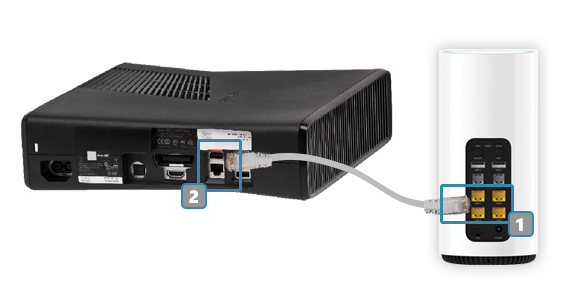
C: Connecting to the Nokia WiFi Gateway
- Plug in one end of an Ethernet cable into one of the yellow ports on the Nokia WiFi Gateway located on the wall in your living room.
- Plug the other end of the Ethernet cable into the Ethernet port on your device.
2
Connect with a WiFi Router
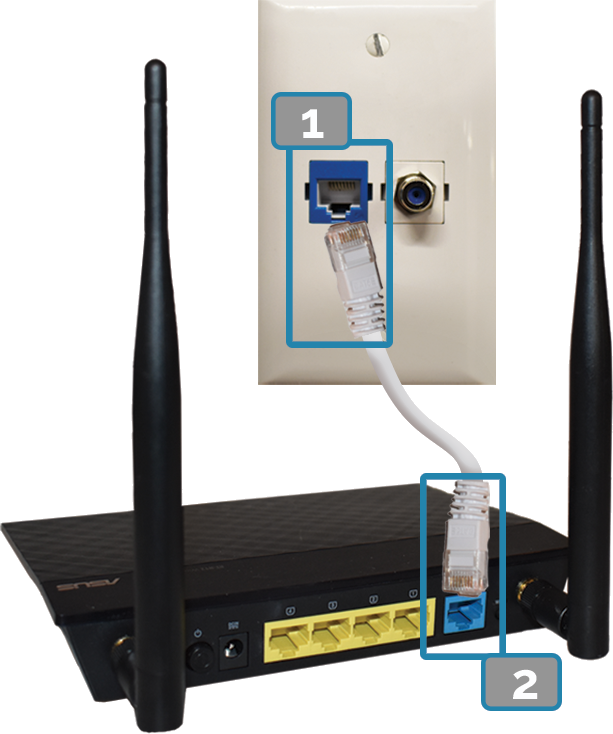
A: Connecting to the Wall Ethernet Port
Required parts: Personal WiFi Router, Ethernet Cable (available for purchase through STELLAR)- Plug one end of the ethernet cable into the wall Internet port on your wall plate in your apartment.
- Plug the other end of the cable into the ethernet port located on your router. This should be the port that is separated from the rest (which is the active Internet port).
Follow the instructions that came with your router to complete setup.
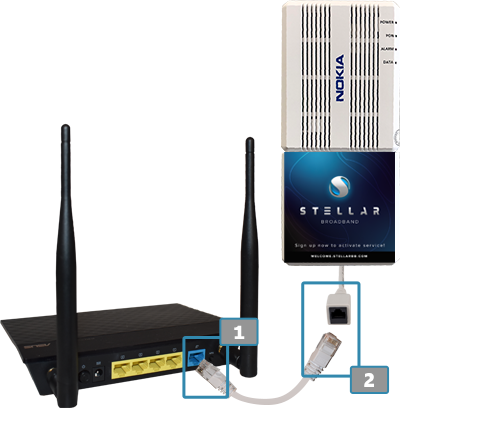
B: Connecting to the Nokia Gateway
- There will be a device on your living room wall as pictured. Plug one end of an Ethernet cable into the Ethernet port attached to it.
- Plug the other end into the Internet IN port on your WiFi router.
3
Connect to WiFi
There are four available networks to connect to, each network has a different use. See below for a list of communities that have WiFi available at their community as well as instructions to connect.
Differences in WiFi Networks
List of Communities with WiFi:
- 226 Beal
- 131 Bogue St. Apartments
- 565 Building
- 129 Burcham
- 731 Burcham
- 787 Burcham
- 133 Durand
- 1200 East Grand River
- 300 East Grand River Ave.
- 1234 Grand River
- 325 Grove
- 316 Gunson
- 513 Hillcrest
- 915 Lilac
- 114 Linden
- 335 Linden
- 137 Louis
- 215 Louis
- 240 Michigan Apartments
- 241 Louis Apartments
- 348 Oakhill
- 122 Stoddard
- 221 Trowbridge Flats
- 251 West Grand River (253/255)
- 609 West Grand River
- Abbott Pointe
- Albert Apartments
- Americana A
- Americana B
- Arena Place
- Arbor Glen
- Auburn Place
- Barley Flats
- Beech Townhomes
- Beechwood
- Berrytreee
- Burcham Place
- Burcham Woods
- Campus Gate
- Campus Hill
- Campus View
- Capitol Villa
- Cedar Greens
- Cedar Street
- Cedar Village
- College Towne
- Towne Square
- Courtyard Flatlets
- Delta Arms
- Diamond Place
- East Knolls
- Eden Roc
- Ferndalehaus
- Fulton Place
- Gateway at Belknap
- Glenwood
- Haslett Arms
- Knob Hill
- Midtown City Zen
- NoCa Lofts
- Northpointe
- Oakridge
- Old Canton
- Pine Lane
- River Park
- Riverwalk
- St. Anne Lofts
- Stonehouse Village
- Stonehouse Village II
- Studio House
- The Avenue
- The Element
- The Hamptons
- The Linden
- The Oaks
- The Outfield
- The Pines
- The Quarters
- The Quarters II
- The Residences
- The Rocks
- The Venue
- Treehouse North
- Treehouse West & II
- Treehouse South
- Trowbridge Lofts
- University Terrace
- University Villa
- Waterbury Place
- Waterfront
- Waters Edge
- Venue Tower
Connect to Stellar Sign Up:
- This network is intended only for the initial subscription of services and does not provide permanent Internet access.
- Connecting to this network will redirect you to the STELLAR Welcome Page where you will subscribe for service.
- Once you've submitted your order and received notifications that services are activated, you can connect to the other WiFi networks (i.e. Stellar 2.4, Stellar 5, Stellar Registered Devices).
Connect to Stellar 2.4 or Stellar 5:
Connect phones, tablets, and laptops to this network.
- Click Stellar 2.4 or Stellar 5 in the WiFi settings on your device.
- Enter the email and password you used when subscribing for service.
Note: Certain devices are not compatible with these two networks (see Stellar Registered Devices network).
Connect to Stellar Registered Devices:
This network is used to connect the devices that are not compatible with the networks Stellar 2.4 and Stellar 5. Connect to this network for devices such as:
- Streaming devices
- Smart TVs
- Roku
- Apple TV
- Amazon Fire TV Stick
- Google Chromecast
- Gaming Consoles
- Printers
- Kindles
To connect these devices, you will need to register your device's MAC/WiFi address on your My Account:
- Log into your My Account, click My Services > WiFi in the left navigation bar.
- Enter your device's MAC/WiFi address and click Add.
- Now, you can connect that device to the network Stellar Registered Devices.
4
Unique Network (WiFi Connection for Select Properties)
For Landmark on Grand River, Newman Lofts and CRMC Houses (for duplexes and multiplexes, see option 3 for how to connect to WiFi)
- On your device, locate where you can select a WiFi network. For example, on an iPhone, go to Settings > WiFi. Select the SSID labeled Stellar Sign Up to subscribe for service. Note: This WiFi network is only used to get you to sign up for service.
- Open a web browser and visit: Welcome.Stellarbb.com, select New Customer or Existing Customer and follow the on-screen prompts to subscribe for service.
- After you submit your order, services will be activated based on the dates you selected.
- Once services are activated, a new SSID/Network name and password will be created specifically for your unit and displayed on your My Account (an SMS and email will also be sent to you with this information). These can be customized from your My Account under the WiFi tab.
5
Cross Connect
Cross Connect
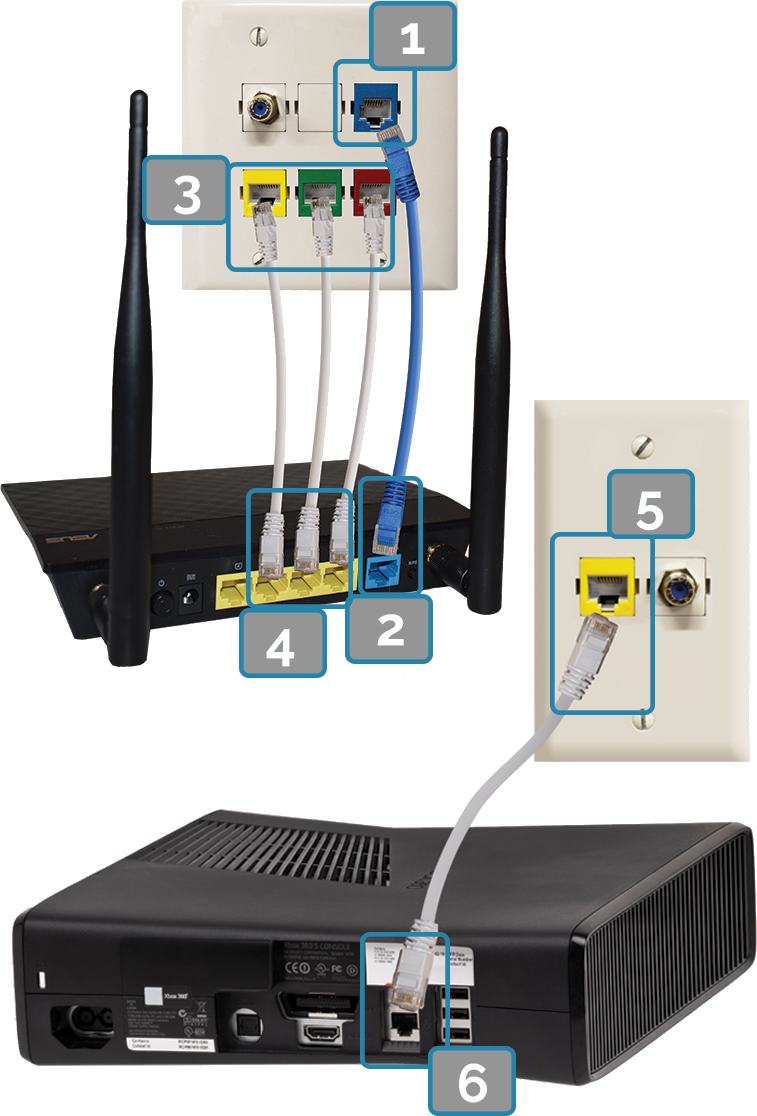
First, you need to find your multi-colored panel which is typically located in the living room, hall closet or utility closet. Once you have located this panel, notice the different colors on the wall plate. These colors represent each room.
The blue port is the active Internet port. One end of your ethernet cable should always be connected to this port. The other end of the cable can be used in two ways: (1) connected to a wireless router to access WiFi, or (2) connected to the colored port representing which room you'd like active Internet in, for a fast, direct connection.
Choose from options A, B or C to connect to the Internet
| Burnt Tree | Cambria townhomes | Midtown | Diamond Place | Carriage Hills | |
| Courtyard Flatlets | Marketplace | Midtown city zen | NoCA Lofts | Oakridge | |
| Pine Lane | The Outfield | Treehouse North | Valley Forge | Waterfront | Woodbrook Village |
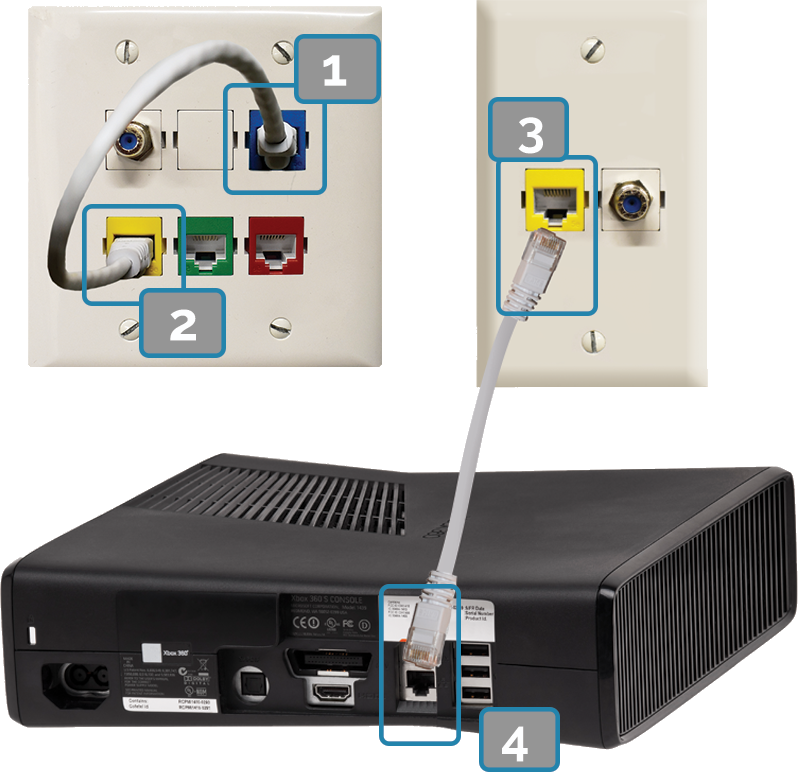
A: Activate a Single Outlet
Required parts: 2 Ethernet cables and a device with an ethernet port.
Determine what color port is in the room you would like to activate Internet in.
- Plug one end of the ethernet cable into the blue Internet port on your multi-colored panel.
- Plug the other end of the ethernet cable into the desired colored room port.
The Internet port is now active in that room. - Plug one end of another ethernet cable into the color-coded port on your wall plate.
- Plug the other end of the ethernet cable into your desired device (laptop, gaming console, etc.)
B: Activate Wireless Router
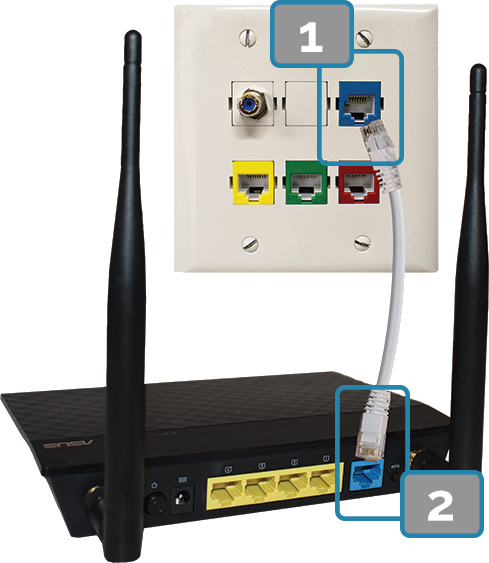
Required parts: 1 Ethernet cable and a personal WiFi router.
- Plug one end of the ethernet cable into the blue Internet port on your wall plate.
- Plug the other end of the ethernet cable into the Internet IN port on your router. This port should be separated from the others.
Follow the instructions that came with your router to complete setup.
C: Activate Multiple Outlets
Required parts: 2-10 ethernet cables (depending on how many rooms you want to activate), a personal WiFi router, and devices with ethernet ports.
Determine what color port is in the room you would like to activate Internet in.
- Plug one end of the ethernet cable into the blue Internet port on your multi-colored panel.
- Plug the other end of the ethernet cable into the Internet IN port on your router. This port should be separated from the others.
- Plug one end of another ethernet cable into one of the color-coded ports on your multicolored panel.
- Plug the other end of the ethernet cable into one of the other ports on your WiFi router.
- Plug one end of another ethernet cable into the color-coded port on your wall plate.
- Plug the other end of the ethernet cable into your desired device (laptop, gaming console, etc.)
Repeat steps 3-6 for each room you want active.
